
The Angular CLI is a powerful tool that makes it easy to build high quality Angular applications. With the Angular CLI, we can scaffold, develop, test, build, and deploy our Angular applications with very little efforts.
For beginners, the Angular CLI is tantamount to a few commands that help them kickstart new Angular projects quickly like ng new, ng generate, ng serve, etc. But for experts, the Angular CLI is much more than just a scaffolding tool. Rather, it’s a set of tools that can improve the productivity of your development teams, the quality, and the performance of your Angular applications.
Table of contents
- What is the Angular CLI?
- Installing the Angular CLI
- Hello Angular!
- Getting Help From the CLI
- The Architecture of the Angular CLI
- Scaffolding a New Angular Project with Routing and Sass—
ng new - Serving your Angular application—
ng serve - Generating Some Boilerplate Code—
ng generate - Linting and Testing Your Application—
ng lint,ng testandng e2e - Building—
ng build - Conclusion
Welcome to our blog series dedicated to the Angular CLI. The goal of this blog series is to take us from beginners to experts by teaching us everything we should know about the Angular CLI.
In this first article, we are going to take a look at the Angular CLI, the problems it solves and how to start building Angular applications with it.
What is the Angular CLI?
The Angular CLI is the official command line interface used within the Angular ecosystem. Its goal is to make it easy to build high quality Angular applications.
The Angular CLI is a complete toolkit for Angular development that provides you with a way to quickly scaffold a new project via ng new, generate code from predefined blueprints via ng generate, update existing code via ng update, and add some frameworks support to an Angular application via ng add.

Free eBook
Directives, simple right? Wrong! On the outside they look simple, but even skilled Angular devs haven’t grasped every concept in this eBook.
-
 Observables and Async Pipe
 - Identity Checking and Performance
- Web Components <ng-template> syntax
- <ng-container> and Observable Composition
- Advanced Rendering Patterns
- Setters and Getters for Styles and Class Bindings
It also takes care of the build process of your projects (ng build), and gives you out of the box:
- TSLint integration via
ng lint, - unit testing support via
ng test, - end-to-end testing support via
ng e2e, - a development server via
ng serve, - and much more.
Thanks to the CLI, the development experience with Angular is fantastic, and getting started is easy. But, before using the Angular CLI, we will need to install it. Let’s learn how!
Installing the Angular CLI
Prerequisites
To use the Angular CLI, you must have the latest active LTS version of Node.js—currently version 10—installed in your computer. If you don’t have Node.js installed, see instructions here.
If you are on Linux or MacOS environment, I recommend you to have a look at Node Version Manager (NVM)—a tool that makes it easy to switch between different Node.js versions on the same machine. On Windows, checkout nvm-windows.
To verify your installation of Node.js, run node -v in a terminal window and check that the displayed version is greater than 10.9.
Installation
Node.js comes with npm—Node Package Manager—that we will use to install the Angular CLI in our machine. To do so, open a terminal window and run the following command:
npm install -g @angular/cli
Once you’ve successfully installed the Angular CLI, it will be available to you as the ng executable on the command line.
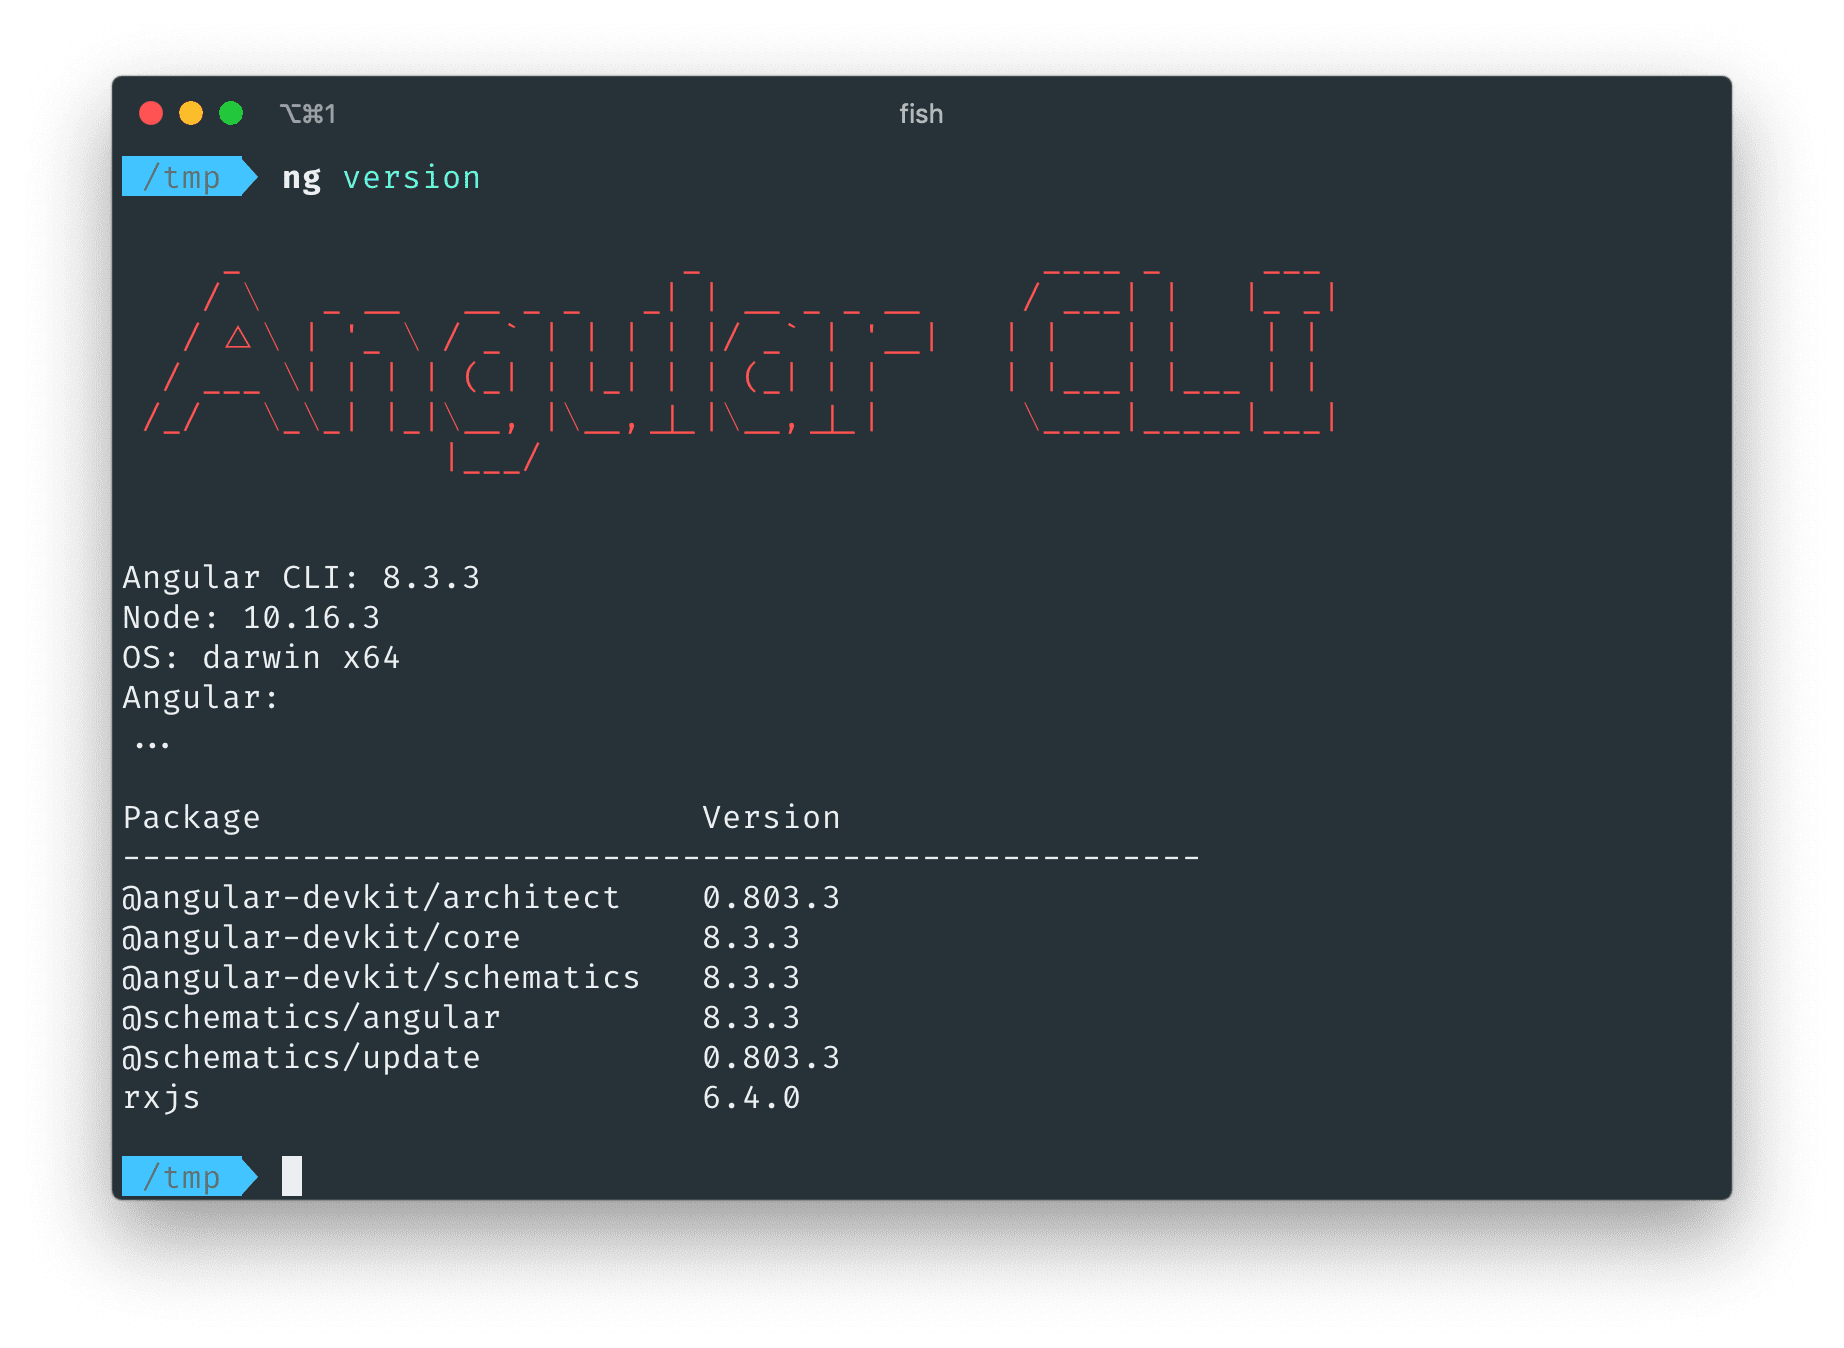
To verify that you’ve correctly installed the CLI, run the following command in a terminal:
ng version
This should output the version of the Angular CLI you’ve installed as well as some other information like the version of Node.js you’re using and your current operating system.
We are now ready to explore the Angular CLI. Let’s get started!
Hello Angular!
To create a new Angular project, we use the ng new command:
ng new my-app
This command will create a new Angular project for you once you’ve answered the following questions:
- “Do you want routing?” You will most likely need routing in your Angular applications but for now let’s use the default value (
No) by pressingENTER. - “Which stylesheet format do you want?” Once again, press
ENTERand the CLI will use CSS—the default stylesheet format.
Example Output:
CREATE my-app/README.md (1027 bytes)
CREATE my-app/.editorconfig (246 bytes)
CREATE my-app/.gitignore (631 bytes)
CREATE my-app/angular.json (3593 bytes)
CREATE my-app/package.json (1290 bytes)
CREATE my-app/tsconfig.json (543 bytes)
CREATE my-app/tslint.json (1988 bytes)
CREATE my-app/browserslist (429 bytes)
CREATE my-app/karma.conf.js (1018 bytes)
CREATE my-app/tsconfig.app.json (270 bytes)
CREATE my-app/tsconfig.spec.json (270 bytes)
CREATE my-app/src/favicon.ico (948 bytes)
CREATE my-app/src/index.html (291 bytes)
CREATE my-app/src/main.ts (372 bytes)
CREATE my-app/src/polyfills.ts (2838 bytes)
CREATE my-app/src/styles.css (80 bytes)
CREATE my-app/src/test.ts (642 bytes)
CREATE my-app/src/assets/.gitkeep (0 bytes)
CREATE my-app/src/environments/environment.prod.ts (51 bytes)
CREATE my-app/src/environments/environment.ts (662 bytes)
CREATE my-app/src/app/app.module.ts (314 bytes)
CREATE my-app/src/app/app.component.css (0 bytes)
CREATE my-app/src/app/app.component.html (24263 bytes)
CREATE my-app/src/app/app.component.spec.ts (981 bytes)
CREATE my-app/src/app/app.component.ts (210 bytes)
CREATE my-app/e2e/protractor.conf.js (810 bytes)
    Successfully initialized git.
The ng new command has scaffolded a new Angular project with all the necessary files and installed all the dependencies needed for Angular development.
You can now cd into the my-app directory and launch your newly generated project in the browser by running the following command:
ng serve
Head over localhost:4200 in your favorite browser and you should see something like this:
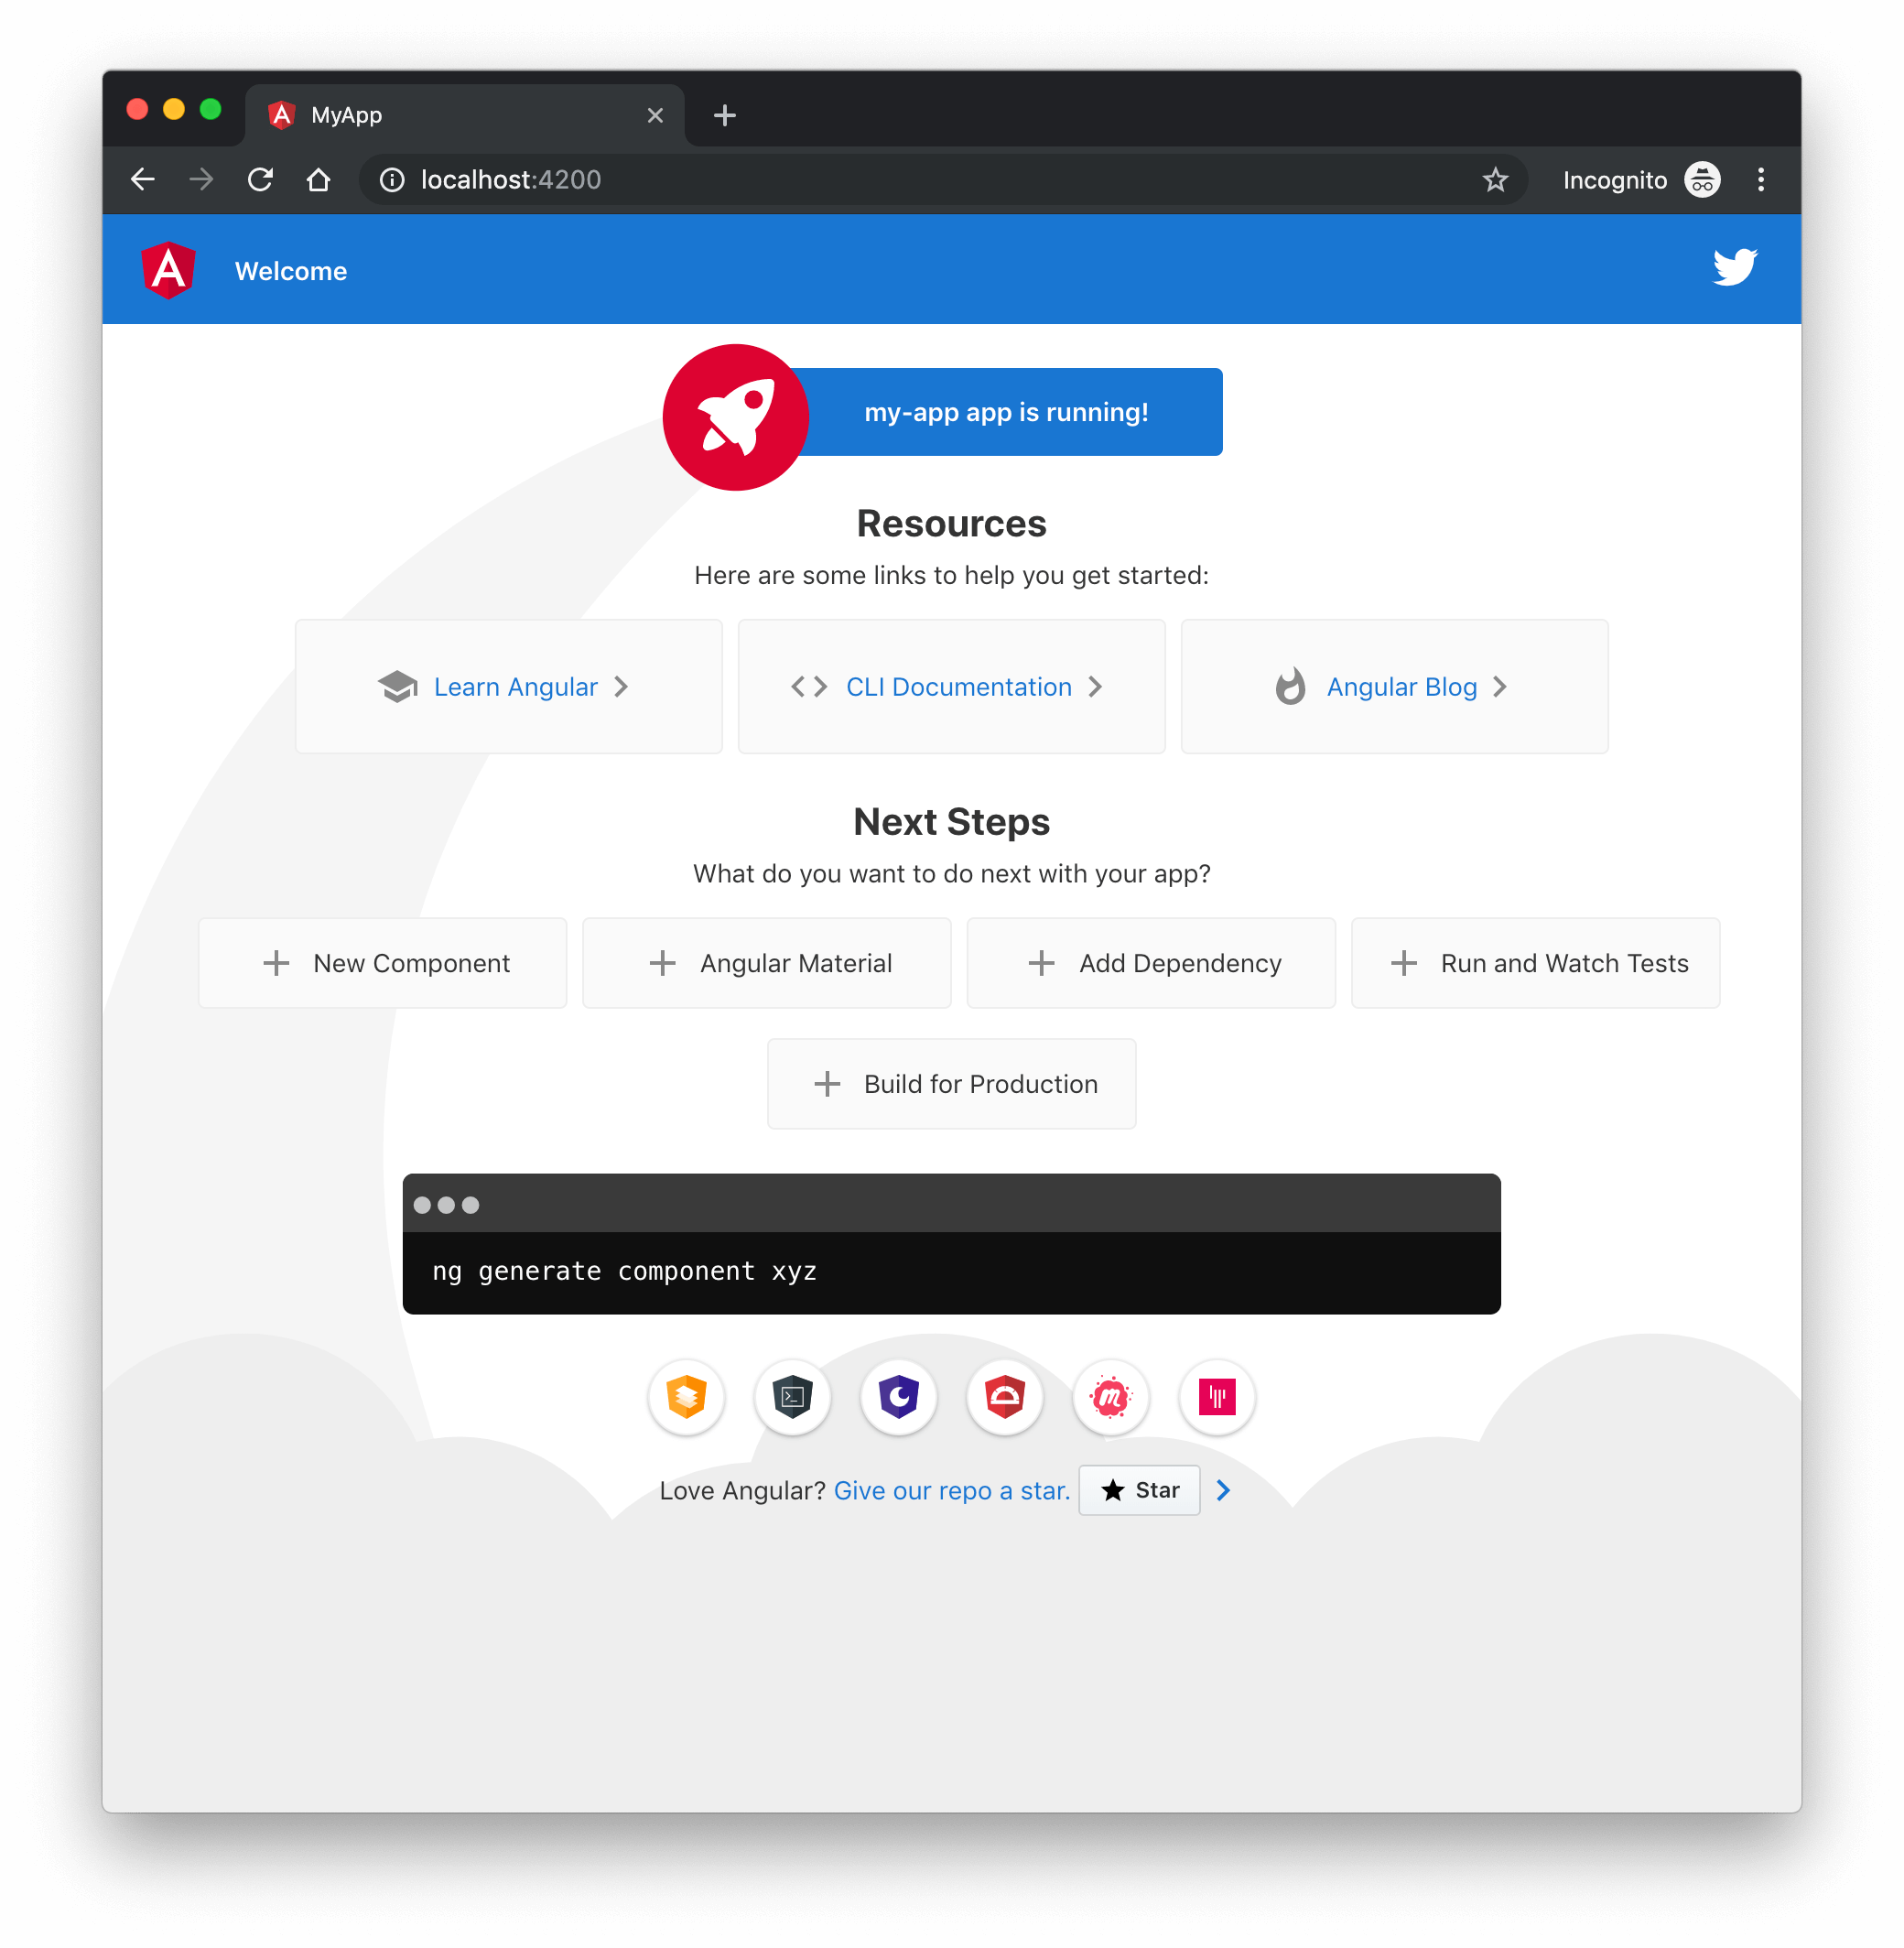
Congratulations! you’ve successfully developed your first Angular application. That’s all it takes to get started with the Angular CLI: two commands 😉.
This is cool, right? But in real life, you’re not building a “Hello World” application. In the remainder of this article, we will see how you would initialize a real world Angular application.
Getting Help From the CLI
Before we get started, I want to point out that you can pass some options to most of the Angular CLI commands. The most important option is --help to get some help for the CLI.
The --help option
To see detailed documentation for a specific CLI command, you can use the --help flag. Passing the --help flag to a given command will print out the description of that command, the arguments it takes, and all the different options it supports. Try passing the --help to the ng new command for instance:
ng new --help
The ng help command
Similarly, we have a command that lists all the available commands and their description:
ng help
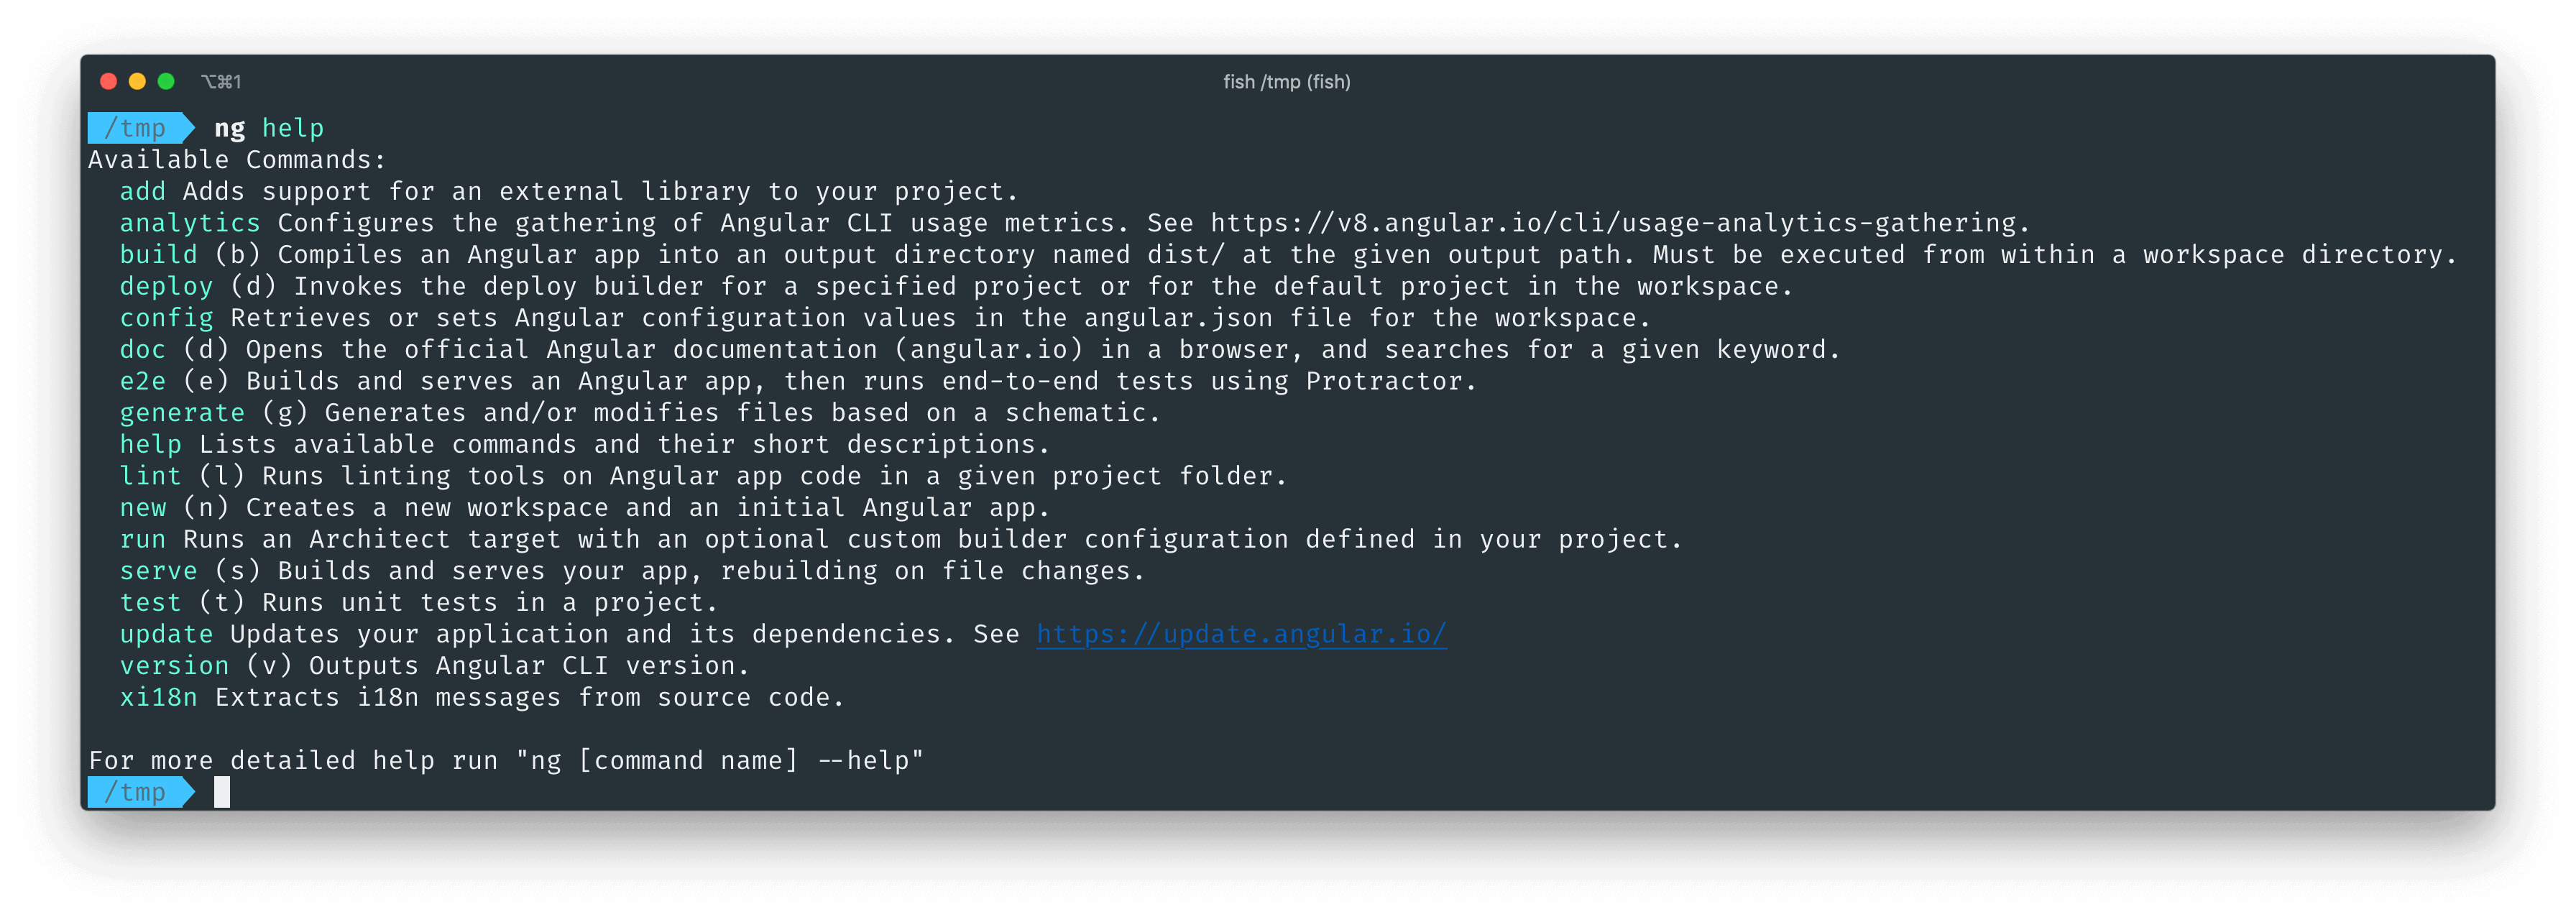
As you can see, there are a lot of commands. Many of them take similar arguments and options because they accomplish similar tasks. So it’s not important that you remember them all. Instead, focus on the mental model of the Angular CLI and you will master the most important commands and options. This will help you understand why some Angular CLI commands work the way they do.
The Architecture of the Angular CLI
To understand the architecture of the Angular we can take a look at two core sets of problems it solves.
Set of Problems 1
How do we start a new Angular project? Do we start from scratch and manually create all the necessary files whenever we want to start a new project? Do we copy & paste from an existing project? Or do we clone a repo and then remove the code we don’t need and keep what we need?
ng new
There are a lot of concepts involved in a full-featured Angular application: modules, components, services, directives, pipes. Do you generate all that code by hand?
ng generate
What do you do when you want to add an external framework to your Angular application? You open the documentation of that framework and follow a long list of boring instructions? Tired of repeating the exact same steps for your multiple projects?
Many Angular libraries authors provides a way to set up their library by running a single command:
ng add
The Frontend landscape evolves very fast. So does Angular. How do you keep up with the fast release cadence of Angular?
ng update
All the above commands (ng new, ng generate, ng add, ng update) have something in common: they apply transformations to our code base either by producing new code or by modifying existing code. These commands are called Schematics Commands.
Set of Problems 2
Before we ship our code to production we need to make sure that it is free from defects by having a great test suite. For web applications we generally write unit tests and end-to-end tests. Testing by itself is hard. But you know what? The most difficult part of testing is the setup.
The Angular CLI got us covered with two commands for testing:
ng test # for unit tests
ng e2e # for end-to-end tests
How do you enforce that all developers in a project follow the team’s coding standards? Do you wait for the code review to discover these kind of problems? No you set up linting as part of your development process…
ng lint
While developing an application, we don’t want to deploy it to a production server every time we make a change because this is counterproductive. Instead what we want is to be able to run our code locally in the browser and see changes instantly.
ng serve
We write our Angular applications in TypeScript but the browsers only understand JavaScript. Therefore our code needs to be transpiled to JavaScript and bundled it into a format that the browser understand before our users can use our applications. But this is just the beginning: we care about our users, so we want to ship to them the smallest and most performant Angular applications by optimizing, minifying, tree-shaking our code.
ng build
Wanna deploy easily deploy your Angular applications to your preferred hosting platform? Once again the Angular CLI got you covered with:
ng deploy
All the above commands resolve around the development process (ng serve, ng test, ng e2e, ng lint), and the build and deployment process (ng build, ng deploy). They are called Architect Commands.
There are two other architect commands that we didn’t mention
ng xi18n, andng run. We will learn more about theng runcommand in an upcoming article.
How the Angular CLI solves these core problems?
To solve these two core sets of problems, the Angular CLI uses two different tools under the hood. So you can think of the Angular CLI as a facade that uses:
- the Schematics tool—from the
@angular-devkit/schematicspackage—for code generation and modification; - the Architect tool—from the
@angular-devkit/architectpackage—to handle the development process, the build process, and the deployment process.
Now that we understand the architecture of the Angular CLI, we can focus a little bit on the commands.
Scaffolding a New Angular Project with Routing and Sass—ng new
Let’s scaffold a new Angular project again! This time, we will enable routing and use a CSS preprocessor. You can use run ng new without any options and you’ll be prompted the same questions as before but we can avoid this extra step by passing options directly to the ng new command like this:
ng new --routing --style=scss ultimate-app
This tells the Angular CLI to use Sass, the most popular CSS preprocessor out there but you can select your preferred stylesheet format among css, sass, less, and stylus. This will also automatically set up routing in our Angular application.
--routingis equivalent to--routing=true. Similarly, you can use--no-routingfor--routing=false. All options that take boolean values behave similarly.
Main ng new options
--routing: whether to set up routing or not.--style: the stylesheet format to use amongcss,sass,less, andstylus.--prefix: the prefix used for components and directives selectors. By default it’sapp.--create-application: whether to create an initial Angular application or not. Set this flag to false if you plan to have multiple Angular applications in the same Git repository.--minimal: create a minimal project without setting up unit testing nor e2e testing.--collection: the Angular CLI is customizable. You use this option to use a different set of schematics for code generation.
Serving your Angular application—ng serve
ng serve --open
The ng serve command will build your Angular app in memory and spin up a web server that runs your Angular application in development mode. Under the hood, the Angular CLI uses Webpack to compile your code, and the Webpack Dev Server as a web server with live reloading functionality which means that if you change any of your source files, your Angular application will automatically reload in the browser. With the --open flag, the CLI will automatically open localhost:4200 on your default browser once the compilation is done.
By default, your application is “served” on port 4200. But sometimes, you will want to run your application on another port—maybe you already have on running on port 4200. To achieve that, you use --port option like this:
ng serve --port=4300
Main ng serve options
--open: whether to automatically open the application in the browser.--port: specify on which port to serve your application.--proxy-config: this is the most important option of theservecommand and one of the least known features of the Angular CLI. It allows you to set up a proxy to a backend and redirect certain HTTP calls to another port or another server. For example, you can redirect all calls from http://localhost:4200/api to http://localhost:8080/api. Learn more here.--ssl: serve the application using the HTTPS protocol.
Generating Some Boilerplate Code—ng generate
Once you’ve a skeleton of an application, you’ll want to add more features, hence more code to your project.
To do that, you use the ng generate command and you pass it the “schematic” you want to use for the code generation. Schematics are the blueprints used to generate code. There is schematic for pretty much every Angular concept like services, directives, pipes, and so on:
ng generate <schematic>
Let’s see some examples of the generate command in action!
Generating a lazy-loaded module:
ng generate module team --route=teams --module=app
Modules play a crucial role in an Angular application. The official style guide recommends to create one module for every cohesive block of functionality and the CLI makes it easy to do so. The above command will:
- create an Angular module named
TeamModule, - set up the lazy-loading of the
TeamModuleinside the main routing module—AppRoutingModule, associating the route/teamswithTeamModule, - declare a component
TeamComponentinsideTeamModuleand associate it with the route/teams.
Generating a component:
ng generate component team/components/team-list --module=team --export
- generate a component
TeamListComponentinside theteam/componentsdirectory, - declare it the
TeamModule, - add it to the
exportsarray of theTeamModuleto make available to any module importingTeamModule.
Generating a Service
ng generate service team/services/team
- Generate a service called
TeamServiceinside theteam/servicesdirectory.
Linting and Testing Your Application—ng lint, ng test and ng e2e
ng test
The test command will run all our unit tests with Karma in watch mode.
ng e2e
Run e2e tests with Protractor.
ng lint --fix
This command will lint our code. In addition, try to automatically fix any linting error thanks to the --fix flag.
Building—ng build
ng build
To build our Angular application we use the build command. This will generate the build artifacts in the dist/ultimate-app folder because our application is named ultimate-app. Here is the list of files it generated:
dist/ultimate-app/
├── favicon.ico
├── index.html
├── main-es2015.js
├── main-es2015.js.map
├── main-es5.js
├── main-es5.js.map
├── polyfills-es2015.js
├── polyfills-es2015.js.map
├── polyfills-es5.js
├── polyfills-es5.js.map
├── runtime-es2015.js
├── runtime-es2015.js.map
├── runtime-es5.js
├── runtime-es5.js.map
├── styles-es2015.js
├── styles-es2015.js.map
├── styles-es5.js
├── styles-es5.js.map
├── vendor-es2015.js
├── vendor-es2015.js.map
├── vendor-es5.js
└── vendor-es5.js.map
The simple application weights around 15MB. Too big? This is because by default the Angular CLI builds our Angular application in development mode i.e., without any optimization. We can tell the Angular CLI to build our application in production mode by adding the --prod flag.
ng build —prod
This will generate a production build with many great optimizations like:
- Ahead of Time Compilation (AOT),
- minification,
- tree-shaking,
- dead code elimination,
- hashing the static assets for cache busting,
- no sourcemap for debugging,
- an so on.
In this example we end up with an artifact size of approximately 764KB. It’s way better!
dist/ultimate-app/
├── 3rdpartylicenses.txt
├── favicon.ico
├── index.html
├── main-es2015.dd07506e70c01d501d26.js
├── main-es5.dd07506e70c01d501d26.js
├── polyfills-es2015.015dc50b3fa948805c69.js
├── polyfills-es5.a47ef122593d5bf824ec.js
├── runtime-es2015.4d64995604cae804f2ff.js
├── runtime-es5.4d64995604cae804f2ff.js
└── styles.09e2c710755c8867a460.css
Conclusion
In this article, we’ve just scratched the surface of what is really possible to do with the Angular CLI. The Angular CLI is probably one of the most important tools in our possession as Angular developers and mastering it will make you more productive and help you build better Angular applications.
In upcoming blog posts, we will be diving more into the underlying tools that power the Angular CLI like workspaces, schematics, and architects. Stay tuned!

