
There are several convenient options with NativeScript to build your app’s user interface. You can use the framework’s core ui components which offer a nice baseline of common components almost every app may need. You can include platform plugins which provide custom and unique view experiences. Or you can build your own from scratch which is what we’re going to focus on in this article.
Table of contents
Brief mobile platform background
On iOS, the view architecture uses a well formalized and mature inheritance structure called UIKit which can be explored in Apple’s docs here. The base class which all inherit from is UIView. It’s from this core class and any subclass to it that you can build custom NativeScript views.
On Android, the view architecture uses a similarly well formalized and mature inheritance structure. The android.view package offers the basic view building block, the View class. This is similar to iOS and serves as a base view class for the same purposes on Android.

Free eBook
Directives, simple right? Wrong! On the outside they look simple, but even skilled Angular devs haven’t grasped every concept in this eBook.
-
 Observables and Async Pipe
 - Identity Checking and Performance
- Web Components <ng-template> syntax
- <ng-container> and Observable Composition
- Advanced Rendering Patterns
- Setters and Getters for Styles and Class Bindings
With NativeScript you get a base class also called View which rolls up both of the above respectively for each platform allowing you to work with just 1 consistent api vs. 2 different api’s while still achieving the same performance characteristics on each.
Anatomy of a custom NativeScript view
The mechanics that NativeScript uses to provide this nice consistency between both iOS and Android view composition is open for you to use yourself unlocking a dizzying array of creative possibilities to mobile development.
Custom views can be created with the following:
import { View } from 'tns-core-modules/ui/core/view';

export class MyCustomView extends View {
  createNativeView() {
    /**
     * required
     * This must return a native iOS or Android view
     */
    return (UIView || android.view.View);
  }
  initNativeView() {
    // optional
  }
  disposeNativeView() {
    // optional
  }
}
With Angular projects you can then register this new element for use. A good place to register is in the root app component of any Angular app:
import { registerElement } from 'nativescript-angular/element-registry';

// register custom views for your app
registerElement('MyCustomView', () => require('../path/to/custom-view').MyCustomView);

@Component({
  selector: 'app-root',
  templateUrl: 'app.component.html',
})
export class AppComponent {}
You are now free to use your custom native view anywhere in your app as you might expect:
<MyCustomView></MyCustomView>
It’s worth noting that you can use any NativeScript class as the base of your custom native view. For example, if you wanted to build a custom Button you could extend NativeScript’s Button or if you wanted to create a unique custom layout container you could extend NativeScript’s GridLayout. The possibilities are vast.
Custom view best practice
You could certainly build 1 custom view class and insert isIOS or isAndroid conditionals like the following:
createNativeView() {
  if (isIOS) {
    return UIView;
  } else if (isAndroid) {
    return android.view.View;
  }
}
Do not do this. This would be bad practice as it will undoubtedly become hard to maintain over time not to mention easy to introduce bugs this way.
Instead NativeScript supports .ios and .android filename suffix to split platform functionality cleanly like the following:
custom-view.ios.ts:
createNativeView() {
  return UIView;
}
custom-view.android.ts:
createNativeView() {
  return android.view.View;
}
As one might expect this now causes a conundrum on how to actually import and use such a split on platform behavior in a single unified codebase. This is where TypeScript definition files save the day. For any platform split class you create you will always create a simple definition file which just exposes the class name for importing throughout your codebase:
custom-view.d.ts:
import { View } from 'tns-core-modules/ui/core/view';

export declare class MyCustomView extends View {}
This now allows you to import as you would want:
import { MyCustomView } from '../path/to/custom-view';
Custom native view use case
Most often when integrating custom native views or researching what may be possible for your project the natural thing to do is look at what NativeScript community plugins are available. If nothing is found from the community the next place to look would be for iOS CocoaPod’s or Android Gradle plugins which suit your needs.
What if nothing suits my needs?
Now is where you would build a custom native view yourself.
I’ll share an example of one I had to build recently for a client project. In fact there was a community plugin available for what we needed by the amazing plugin master Eddy Verbruggen. We were wanting to integrate the brand new iOS 13 Apple SignIn feature. Turns out Eddy had provided a plugin for this here which was very helpful.
However there was a problem. As most mobile developers know, Apple’s app review process can be at times intimidating as well as highly frustrating. With any iOS feature implementation you generally want to review Apple’s guidelines around usage and whether any rules pertain to your use case. With Apple SignIn, their docs have a specific Guidelines section:
Guidelines As you plan and design your app or website for Sign in with Apple, make sure to follow these guidelines: Human Interface Guidelines App Store Review Guidelines Usage Guidelines for Websites and Other Platforms Apple Developer Program License Agreement
In particular the Human Interface Guidelines state this:
To help people set up an account and sign in, it’s best to use the familiar buttons that Apple provides for Sign in with Apple. When you use the system-provided APIs to create a Sign in with Apple button, you get: A button that’s guaranteed to use an Apple-approved title, font, color, and style Assurance that the button’s contents maintain ideal proportions as you change its > style Automatic translation of the button’s title into the language that’s set for the > device Support for configuring the button’s corner radius to match the style of your UI > (iOS, macOS, and web) A system-provided alternative text label that lets VoiceOver describe the button
The language here sounds like a recommendation/suggestion to use their own button’s to ensure you don’t accidentally use an unapproved title, font, color and style. Therefore we did not want to risk getting rejected in the App Store for not using the right approved button style. The other thing that jumped out here which ended up being a nice benefit to using their native Apple SignIn button was:
Automatic translation of the button’s title into the language that’s set for the > device
This app was international and having auto translation was a big bonus especially considering the exact translatable string Apple would approve for sign in is likely important as well.
Back to Eddy’s plugin nativescript-apple-sign-in. We absolutely do want to use this as it provides the authentication implementation we would otherwise have to write ourselves. However it does not provide the native SignIn button component that could become an issue on Apple Review.
So let’s build one.
Build Apple Sign In button
We start out by doing exactly what we discussed above by creating platform split files to prepare our custom native view component:
apple-signin-button.ios.ts:
export class AppleSignInButton extends View {
  createNativeView() {
    return UIView.alloc().initWithFrame(CGRectMake(0, 0, 0, 0));
  }
}
apple-signin-button.android.ts:
export class AppleSignInButton extends View {
  createNativeView() {
    return new android.widget.LinearLayout(this._context);
  }
}
apple-signin-button.d.ts:
import { View } from 'tns-core-modules/ui/core/view';

export declare class AppleSignInButton extends View {}
For the iOS view we start out with the basic building block of all iOS views as mentioned, the UIView. This shows how to init one properly. Respectively on Android, we use a common native Android layout container which takes the context as the argument which is conveniently provided by NativeScript’s View superclass.
In order to type freely with intellisense against pure iOS and Android native api’s like this be sure to install NativeScript’s platform definition files with this:
npm i tns-platform-declarations --save-dev
You can then reference them in your projects root references.d.ts file (if you don’t have one just create this file in root of your project) with the following contents:
/// <reference path="./node_modules/tns-platform-declarations/ios.d.ts" />
/// <reference path="./node_modules/tns-platform-declarations/android-19.d.ts" />
In fact starting out with precisely this setup when beginning your custom native view building is a great way to start. After registering this element as shown earlier it will now run properly on both iOS and Android. You won’t see anything visually yet because we haven’t built anything unique yet.
Let’s focus our efforts on iOS since this will be an iOS only feature at the moment however Android Apple Sign In is possible as mentioned here.
One important thing always with iOS development is recognizing features which may only be available on certain version of iOS. Apple Sign In is only available starting with iOS 13 and above. Luckily Eddy’s plugin provides a nice boolean method to check this.
Using Apple’s docs as a reference we can implement the button according to their specifications with the following while also allowing it to gracefully degrade on iOS versions where it’s not supported:
import { View } from 'tns-core-modules/ui/core/view';
import { isSignInWithAppleSupported } from 'nativescript-apple-sign-in';

declare var ASAuthorizationAppleIDButton, ASAuthorizationAppleIDButtonType, ASAuthorizationAppleIDButtonStyle;

export declare class AppleSignInButton extends View {
  private _tapHandler: NSObject;

  createNativeView() {
    if (isSignInWithAppleSupported()) {
      const nativeView = ASAuthorizationAppleIDButton.buttonWithTypeStyle(
        ASAuthorizationAppleIDButtonType.SignIn,
        ASAuthorizationAppleIDButtonStyle.WhiteOutline,
      );
      nativeView.cornerRadius = 50;
      this._tapHandler = AppleSignInButtonTapHandlerImpl.initWithOwner(new WeakRef(this));
      nativeView.addTargetActionForControlEvents(this._tapHandler, 'tap', UIControlEvents.TouchUpInside);
      return nativeView;
    } else {
      return UIView.alloc().initWithFrame(CGRectMake(0, 0, 0, 0));
    }
  }
  disposeNativeView() {
    // teardown
    this._tapHandler = null;
    super.disposeNativeView();
  }
}
const AppleSignInButtonTapHandlerImpl = (<any>NSObject).extend(
  {
    tap: function(nativeButton: any, nativeEvent: any) {
      const owner: AppleSignInButton = nativeButton._owner;
      if (owner) {
        owner.notify({
          eventName: 'tap',
          object: owner,
        });
      }
    },
  },
  {
    exposedMethods: {
      tap: {
        returns: interop.types.void,
        params: [interop.types.id, interop.types.id],
      },
    },
  },
);
AppleSignInButtonTapHandlerImpl['initWithOwner'] = function(owner: WeakRef<AppleSignInButton>) {
  const handler = AppleSignInButtonTapHandlerImpl.new();
  handler._owner = owner;
  return handler;
};
There’s a lot to unpack there since it’s using pure iOS api’s which is one of the fascinating and enjoyable things about working with NativeScript. The ability to code freely for the platform you’re building without delay or hassle and with the language of choice you’re building the rest of your entire app, TypeScript.
We’re able to use this component like this:
<AppleSignInButton (tap)="appleSignInAction($event)"></AppleSignInButton>
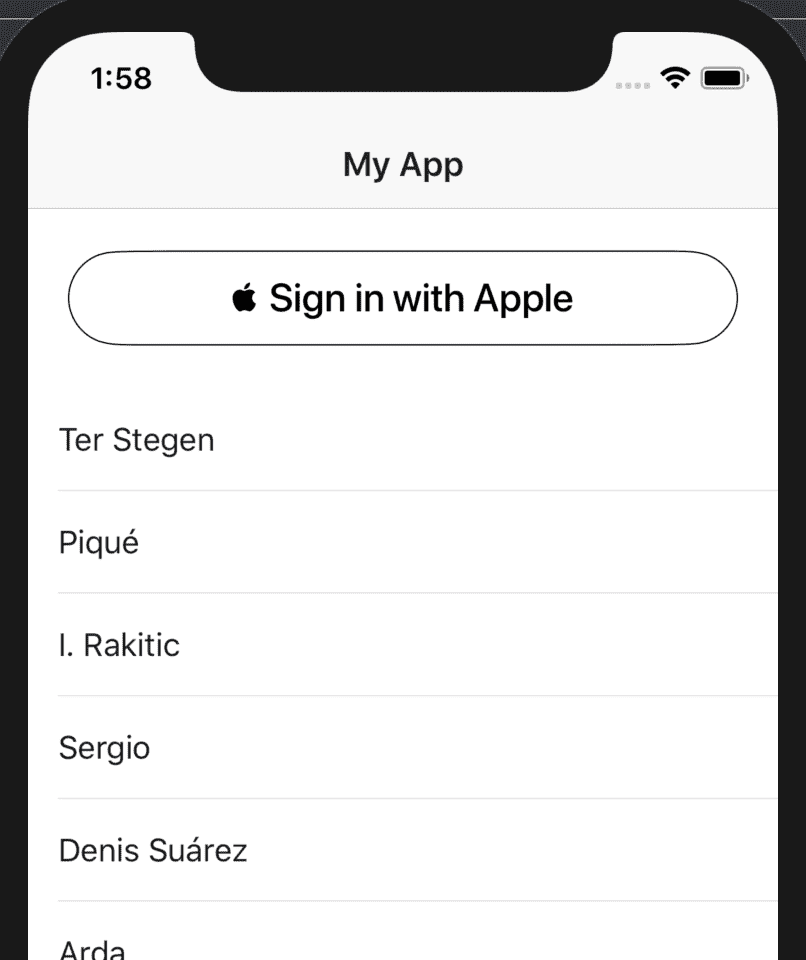
Here is how this renders directly in the NativeScript sample app:
I won’t cover every detail here however a couple things of note:
- We’re implementing a view component exactly to spec as iOS documentation outlines
- By extending NativeScript
Viewwe’re able to take advantage of thenotifyapi to propagate a purely native iOStapgesture directly through to our component’s api for easy data binding - We’re using an alternate syntax for extending
NSObjectusing theNSObject.extend({...pattern which is generally safer to use even if you end up deciding to compile your app to ES6 - see this issue for more understanding - We’re using NativeScript’s
interopnamespace to properly handle exposing native gesture method arguments. Theinteropnamespace “Provides an API for working with native C types, pointers, pointer arithmetic and memory.” - In this example we are using a quick TypeScript shortcut by using
declare var ASAuthorizationAppleIDButtonat the top of our component. You can however use latest NativeScript platform declarations which would provide those symbols globally to your TypeScript IDE. In the event the types are not provided by NativeScript (ie, if using a 3rd party plugin not provided by iOS frameworks directly), you can generate typings for any included 3rd party plugins by running:TNS_TYPESCRIPT_DECLARATIONS_PATH="$(pwd)/typings" tns build ioswhich would generate all the type definition files for your app inside atypingsfolder - Even though this is implemented purely for iOS we could build out Android in a similar way. However the fact we return
new android.widget.LinearLayout(this._context)on Android will ensure that using this component will not crash our app when the component is initialized on Android sincecreateNativeViewis required to return a native view. It will just simply render an empty LinearLayout therefore would not be visible.
Have fun creating your own custom native views!
You can explore and run all the code mentioned in this article here.

