
Welcome to our blog series, Exploring VueJS! In this series, we will have a deep dive into the basic fundamentals of Vue.js, its best practices, and how to build a real Vue app! So, if you’re new to Vue.js and want to learn more in general this is the perfect place to begin!
As the starting point in the series, we will go over the core concepts of Vue.js, and how to set up the environment. By the end of this article, you’ll understand how Vue works, and be prepared to explore the awesomeness in developing with Vue.
Table of contents
Sounds good? Let’s get started!
Vue.js is about view, isn’t it?
Yes and no 😄
Vue or view in English is a reactive, progressive and lightweight component-based JavaScript framework for frontend development. It focuses not only on the view layer but also on scalability and optimisation of developer experience, which often got neglected in other frameworks.
Vue was created in 2013 by Evan You, who was Google developer at that time, and rose to fame with its ease of use and its flexibility rapidly in 2018. At the time of this post, it is considered a real and well-loved contender in the framework/library world.
But why Vue?
Here’s why I love Vue, and a high-level overview for you, and it’ll hopefully answer the question “Why” for you, and this is mainly because of the concepts Vue.js follows. So let’s go through them:
Reactive data-binding
Vue embraces the concept of data-driven, in which the state of the DOM is just a reflection of the data state. Any change in data will trigger the DOM updates automatically. The connection is based on View-Model approach, hence as long as you declare the relationship between your view and data inside a template, Vue will handle the rest.
Composable components
Reusable components are the key for maintaining and handling complex and large applications. In Vue.js, everything is decoupled into components, with pre-defined behaviors. Developers can define, compose and trigger data communication between components. That said, your UI now is actually a tree of components, where components communicate through an API provided by Vue.js. Changes on UI is reduced into changes of specific component(s), with the least effect to the whole app.
Ease of integration
Unlike most frameworks, Vue.js is perfectly capable of being integrated into existing projects as standalone or in combination with other libraries. You can inject a Vue component inside vanilla JavaScript, Angular, or even React projects (though this is not a recommendation for performance efficiency, but it highlights possible migration considerations).
Ease of use
Vue.js syntax APIs are simple and easy to catch up, especially for those who were familiar with AngularJS or jQuery (which most of us were 😅). The documentation is not only well-written, but also kept in the level of human understanding. In addition, Vue.js offers wide ecosystems to help developers in getting their project up and running at ease. And as Evan You put it in his latest update, Vue 3.0 will focus more on optimizing the developer experience.
Performance
Vue is currently one of the fastest and smallest framework in size (18-21kB), hence it’s much more performant in downloading and using, which is very important for front end development.
Isn’t it great?! Yes! So how do we start?
Getting yourself ready
-
First and foremost, because Vue.js is built in JavaScript and designed to work with any JavaScript written framework, basic JavaScript knowledge is a must. Hence make sure you’ve taken our JavaScript Basics course or you know about JS before continuing 😉.
-
Of course, you should know HTML & CSS, for a better and more beautiful UI.
-
Have Node.JS
npmversion 8.9 or above (8.11.0+ recommended) or Yarnyarninstalled in your computer (and of course a computer 🙃) -
Code editor (Recommend VSCode or Webstorm).
-
And enthusiasm for being a Vue master 🥋.
Ready? Let’s start.

Free eBook
Directives, simple right? Wrong! On the outside they look simple, but even skilled Angular devs haven’t grasped every concept in this eBook.
-
 Observables and Async Pipe
 - Identity Checking and Performance
- Web Components <ng-template> syntax
- <ng-container> and Observable Composition
- Advanced Rendering Patterns
- Setters and Getters for Styles and Class Bindings
Setting up
As part of being easy to use, Vue.js offers several ways of installing and setting up your Vue project, which is documented comprehensively.
In this series, we will use the vue-cli tool to quickly set up our environment.
Vue CLI
Vue CLI - the official tool for Vue.js - is a powerful tool to scaffold Single Page Apps, set up environment and build configuration for different purposes, such as testing, hot-reload, production-ready builds.
All you need is to run the following commands in your terminal:
1. Install vue-cli package
We will install it in global scope (-g),in order to use it to create an app beyond the limit of the current directory
npm install -g @vue/cli
// OR
yarn global add @vue/cli
2. Create a Pokemon app from boilerplate using
vue create pokemon-vue-app
3. Selecting presets
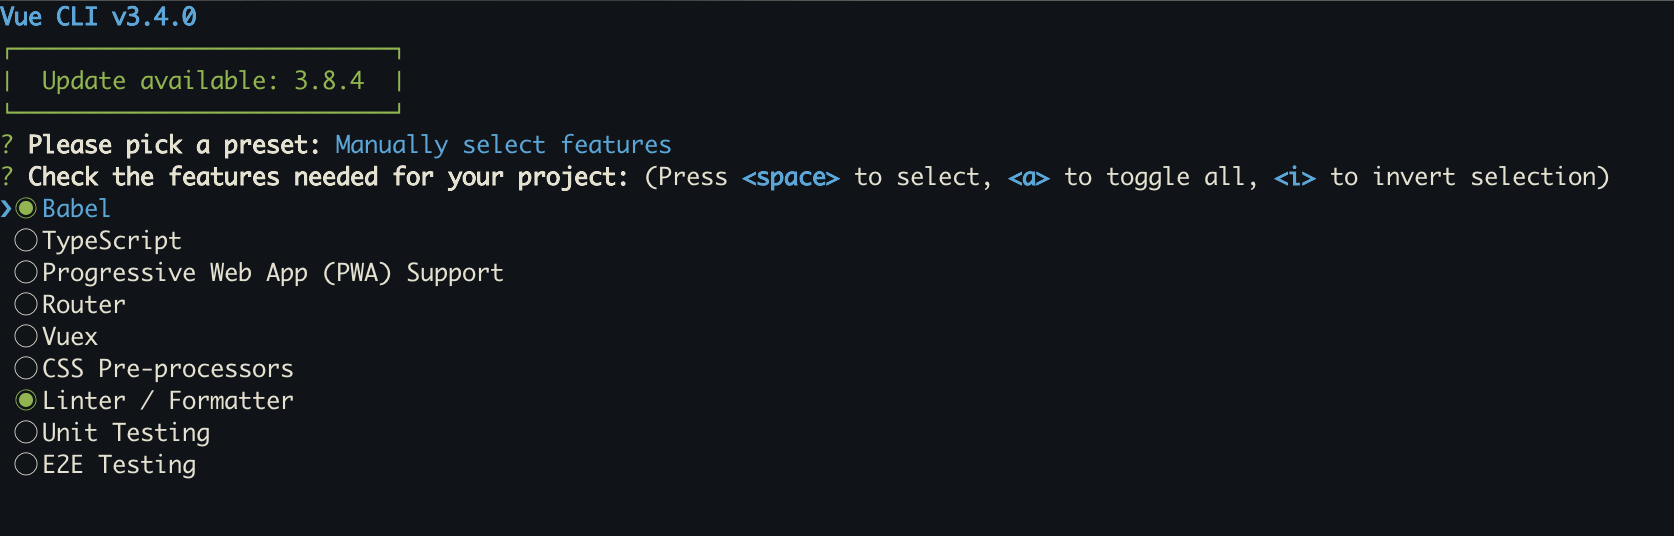
- Babel - JavaScript compiler which helps to convert all ES6+ code into backwards compatible ES2015 version for browser and environment support.
- Linter - Coding tool with a set of rules based on Eslint to define your coding standards, and help to avoid potential errors/bugs which can be dangerous. I will recommend to always enable, for a better coding habit.
- Progressive Web App support (PWA) - Make your app PWA is absolutely recommended, since it supports a lot of functionalities which a normal web app doesn’t. These include working offline, push notifications and device hardware access, giving your app look and feel of native apps on mobile devices. So why not?
- Router - Vue-router is the official router library for Vue.js, for managing app routing and navigating.
- VueX - Official state management pattern + library for Vue.js applications. We will have a post discussed more about its usage later.
- CSS pre-processors - Tool allows you to generate CSS from syntax that don’t exist in pure CSS, such as mixins, nesting selector, inheritance selector. The most commons are Scss, Less and Stylus
- Unit testing - Set up unit testing with Jest or Mocha as built-in option
- E2E testing - End-to-end UI testing such as WebdriveIO, Selenium, etc.
4. For this series, we will select the following:
- Babel, Linter, Router, Vuex and CSS pre-processors (and PWA - optional but highly recommended).
- History mode for router
- Sass CSS with node-sass
- ESLint with prettier
- Lint on save (to keep the code clean and pretty).

Tips: You can use vue ui to create and config your app in more friendly graphical interface.
And yes, we will explore different Vue.js topics through building a Pokemon web application. After all, there’s no better way to learn than practice, right? 😉
Now once the creation process is done, our project is created as a separate folder under the app name - pokemon-vue-app. It’s time to get the app up and running.
Up and running
- Navigate to the app directory by
cd pokemon-vue-app
- Install all the dependencies required for the app to run. Dependencies are different JavaScript frameworks or libraries that our app relies on. And when the installation is completed, we will run the server and get the app displayed in dev environment:
npm install
npm run serve
// OR
yarn install
yarn serve
Your app output should be automatically displayed in browser at localhost:8080, the serving URL will be visible in the terminal as follows:
DONE Compiled successfully in 3704ms

  App running at:
  - Local: http://localhost:8080/
Note: All the commands related to the app are also listed in your package.json under scripts. And, of course, you can add new customized command that fits your needs 🙂:
{
  ...
  "scripts": {
    "serve": "vue-cli-service serve",
    "build": "vue-cli-service build",
    "lint": "vue-cli-service lint",
  }
  ...
}
And that’s it. Our app is up! 🚀
What’s next? Let’s get a hold on the app infrastructure.
Structure in the Vue way
The .vue file format
Vue.js follows the concept of a single-file component. Hence, in addition to the regular .js file system, we also have Vue.js file format as *.vue - to describe a Vue component.
Each *.vue file, or each Vue component, consists of three types of top-level language blocks, using HTML-like syntax:
<template>(Required)
- This is the HTML code of the component, or the template for rendering the component.
- This block should appear once in the file, and has only one child.
// OK!
<template>
  <div>
    <h1>Hello world!</h1>
    <h2>VueJS App</h2>
  </div>
</template>

// NOT OK!
<template>
  <div>
    <h1>Hello world!</h1>
  </div>
  <h2>VueJS App</h2>
</template>
<script>(Optional)
- This is the logic of the component, export as ES Module using
export default, and all the logic will be written in JavaScript. - This block should appear only *once in the file.
<script>
export default {
  name: 'HelloWorld',
  props: {
    msg: String
  }
}
</script>
<style>(Optional)
- CSS styling blocks, hence we can have as many
<style>blocks as we need in a component. - By default, it will be according to CSS standards. Yet there are options to switch to other pre-processor standards using the
langattribute. - There is also the option to use Scoped CSS using
scopesor CSS Modulemoduleattribute. We will get back to this in the upcoming posts of the series.
// Using Sass CSS preprocessing!
<style lang="scss">
h3 {
  margin: 40px 0 0;
}
</style>
custom blocks(Optional) for documentation for example.
Upon compiling, vue-loader will parse, pipe the blocks and assemble them back into an ES Module (Vue component object).
Note: You can actually separate these blocks into separate files, and import only relevant block section inside *.vue file.
main.js
This is our app’s entry file, where we register services, components, routes, and others for global use in our application.
Moreover, it also defines the root element where Vue will render and mount our app to.
import Vue from 'vue';
import App from './App.vue';
import router from './router';
import store from './store';
import './registerServiceWorker';

Vue.config.productionTip = false;

new Vue({
  router,
  store,
  render: h => h(App)
}).$mount('#app');
App.vue
App.vue contains the definition of our app’s root component, where we also define where in the app to render the view component of a route.
router.js
Using vue-router, this is where we define our app routing and navigation logic.
store.js
This is the state management file for our app, using vuex
registerServiceWorker.js
This is where we register our app to browser’s service worker to make our app PWA and have it cache our app’s assets and code.
We use this service worker to enhance performance as well as offline usage. By default, vue-cli already initializes this file for our benefit, so we don’t need to pay too much attention to it.
Components
The location where we will arrange all our reusable components files in.
Views
This folder is where we will store all the relevant components of certain Vue.js routes.
Assets
This is mainly to store our public assets like images. However, in this app, we will not need to use this folder at all 🙂.
So far so good? Indeed.
Conclusion
In general, we have explored what Vue is and how to set up our project using vue-cli step-by-step, with explanations on the available preset tools for our application. Furthermore, we also discussed in detail our application’s structure and the file structure of a Vue component.
Since we understand our way around the app as well as the requirements for a Vue component file, what is our next step?
In the next post, we will cover how data-binding and event listeners are done in Vue.js by creating our first component - the Pokemon Card.
Until then, thank you so much for reading, stay tuned and see you in the next post 🚀!

