
Welcome to the second part of our Exploring VueJS series! In this post, we continue diving into the next important topic of Vue.js - the Vue component, and how to build your first component in our Pokemon app, the Pokemon Card.
Before we start, all the code used in this series can be found here
Ready? Here we go.
Table of contents
The Vue class
All the components in a Vue app are reusable instances of a base class - Vue, with lots of prototype methods. So yes, that includes your app too.
The App instance
Creating the App instance
In general, a Vue app should consist of only one root Vue instance. We can create the root instance using new Vue from an object of configurations. This configuration object is similar to other components’ setting, with a few exceptional root-specific options, such as el.
/* main.js */
import App from './App.vue';

new Vue({

  router, //routing management - we will ignore for now

  store, //state management - we will ignore for now

  render: h => h(App),

})
.$mount('#app');
in which, we use render function to build an HTML view of the instance based on App - the root component options.

Free eBook
Directives, simple right? Wrong! On the outside they look simple, but even skilled Angular devs haven’t grasped every concept in this eBook.
-
 Observables and Async Pipe
 - Identity Checking and Performance
- Web Components <ng-template> syntax
- <ng-container> and Observable Composition
- Advanced Rendering Patterns
- Setters and Getters for Styles and Class Bindings
Mounting the App instance
Upon the creation of the instance, $mount() will be called explicitly with a unique selector string. This selector refers to an HTML element, where the Vue compiler will mount the app component onto during compilation.
Note: Alternatively, we can also mount the instance by passing the HTML element selector to its root-specific el option. Using this option will trigger the compilation immediately after creation.
So the code above can be re-written as:
/* main.js */
new Vue({
  el: '#app', //mount immediately after being created

  router, //routing management - we ignore for now

  store, //state management - we ignore for now

  render: h => h(App),
});
However, $mount() is usually preferred over using el, in the following cases:
-
The chosen element does not exist at the time when the instance is created. The most common use case is in combination with other legacy apps, where components are injected into the DOM on runtime.
-
There is a need to wait for some async processes to complete.
Component tree structure
Components are reusable Vue instances with names. We use them as a way to encapsulate functionalities within the app, and certainly as HTML custom elements. Hence our Pokemon app’s component structure will look like:
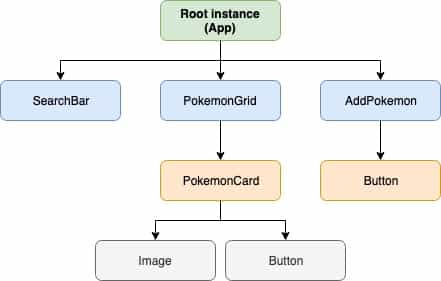
As seen, all the components used within the app will be nested under the root instance of the app’s component tree, to maintain the single source of truth order.
Following that, our Vue app also embraces the single-file component concept for organizing our codebase.
Single-file component
As in our first post, our Vue app architecture follows strictly Single file component approach, which means a .vue file will represent a Vue component.
Basically a .vue file consists of three parts:
- The
<template>(HTML syntax) that will decide UI view of the component. - The (JavaScript) defines the options for creating component instance, following JavaScript Module syntax
export default. - The defines stylesheet code for making the UI great.
In short, within a Vue component:
- Data will flow from the instance options defined in to and
- The instance will receive events emitted from the to perform necessary data updates.
Easy peasy, right?
Let’s create our first component - the Pokemon Card as a new file PokemonCard.vue under components folder and add the following code:
/* Component's options as JavaScript module */
export default {
  //options
}

<style>
  /* Styling */
</style>
So far so good? Next, we’ll take a look at the options object - the one that defines the desired behavior of a Vue component.
The options for creating an instance
There are a lot of options you can choose to configure your component’s behavior. In this post, we will focus on the most basics one, which is: data, methods, and lifecycle hooks.
Data (or local state management)
First and foremost, data is local, which means it is accessible only within the component. data can be either Object or Function. However, in component definition (.vue file or Vue.extend()), data option has to be a function which returns a data object. This is to ensure each instance will have its own independent scoped data.
All properties defined in the returned data object are connected to Vue reactive system. Any change made to these properties will trigger updates to the relevant UI view.
/* PokemonCard.vue */

data: function() {
  return {
    title: "Sample pokemon"
  }
}

//is same as
data() {
  return {
    title: "Sample pokemon"
  }
}
For our Pokemon card, we will define the following properties:
title- Name of the pokemon to displayimage- Photo URL of the pokemon
/* PokemonCard.js */
//in  tag
export default {
  data() {
    return {
      title: "Sample pokemon",
      image: "https://res.cloudinary.com/mayashavin/image/upload/v1562279388/pokemons/br5xigetaqosvwf1r1eb.jpg",
    }
  }
}
All properties defined in data returned object can be accessed directly using this, such as this.title or this.image.
Important notes: Any data property you wish to be reactive, it needs to be defined within data scope.
For example:
export default {
  data() {
    return {
      title: 'Sample pokemon'
    }
  }
};

PokemonCard.title = "Pikachu"; //Trigger the update on UI
PokemonCard.type = "Fire"; //NOT trigger update on UI
The reactive system, upon the creation of the component instance, will inject its tracking system onto each property found in the data object, enabling the binding between view and data.
Since the tracking mechanism will be deep-injected to every property of data object, it applies to all nested properties. That can cause unnecessary performance overhead, similar to cloneDeep.
Therefore it’s recommended to keep data object as flat as possible.
In case you wish to make an object un-reactive, it’s possible to do it using Object.freeze().
Methods
This is where we define all the methods/functionalities that will be accessible to the view.
Take our Pokemon Card, for instance, we will define toggleSelect to mark/unmark the card as selected upon the user’s click.
export default {
  data() {
    return {
      title: "Sample pokemon",
      image: "https://res.cloudinary.com/mayashavin/image/upload/v1562279388/pokemons/br5xigetaqosvwf1r1eb.jpg",
      //Flag property to keep track if component is selected
      isSelected: false
    }
  },
  methods: {
    toggleSelect() {
      this.isSelected = !this.isSelected;
    }
  }
};
Lifecycle hooks
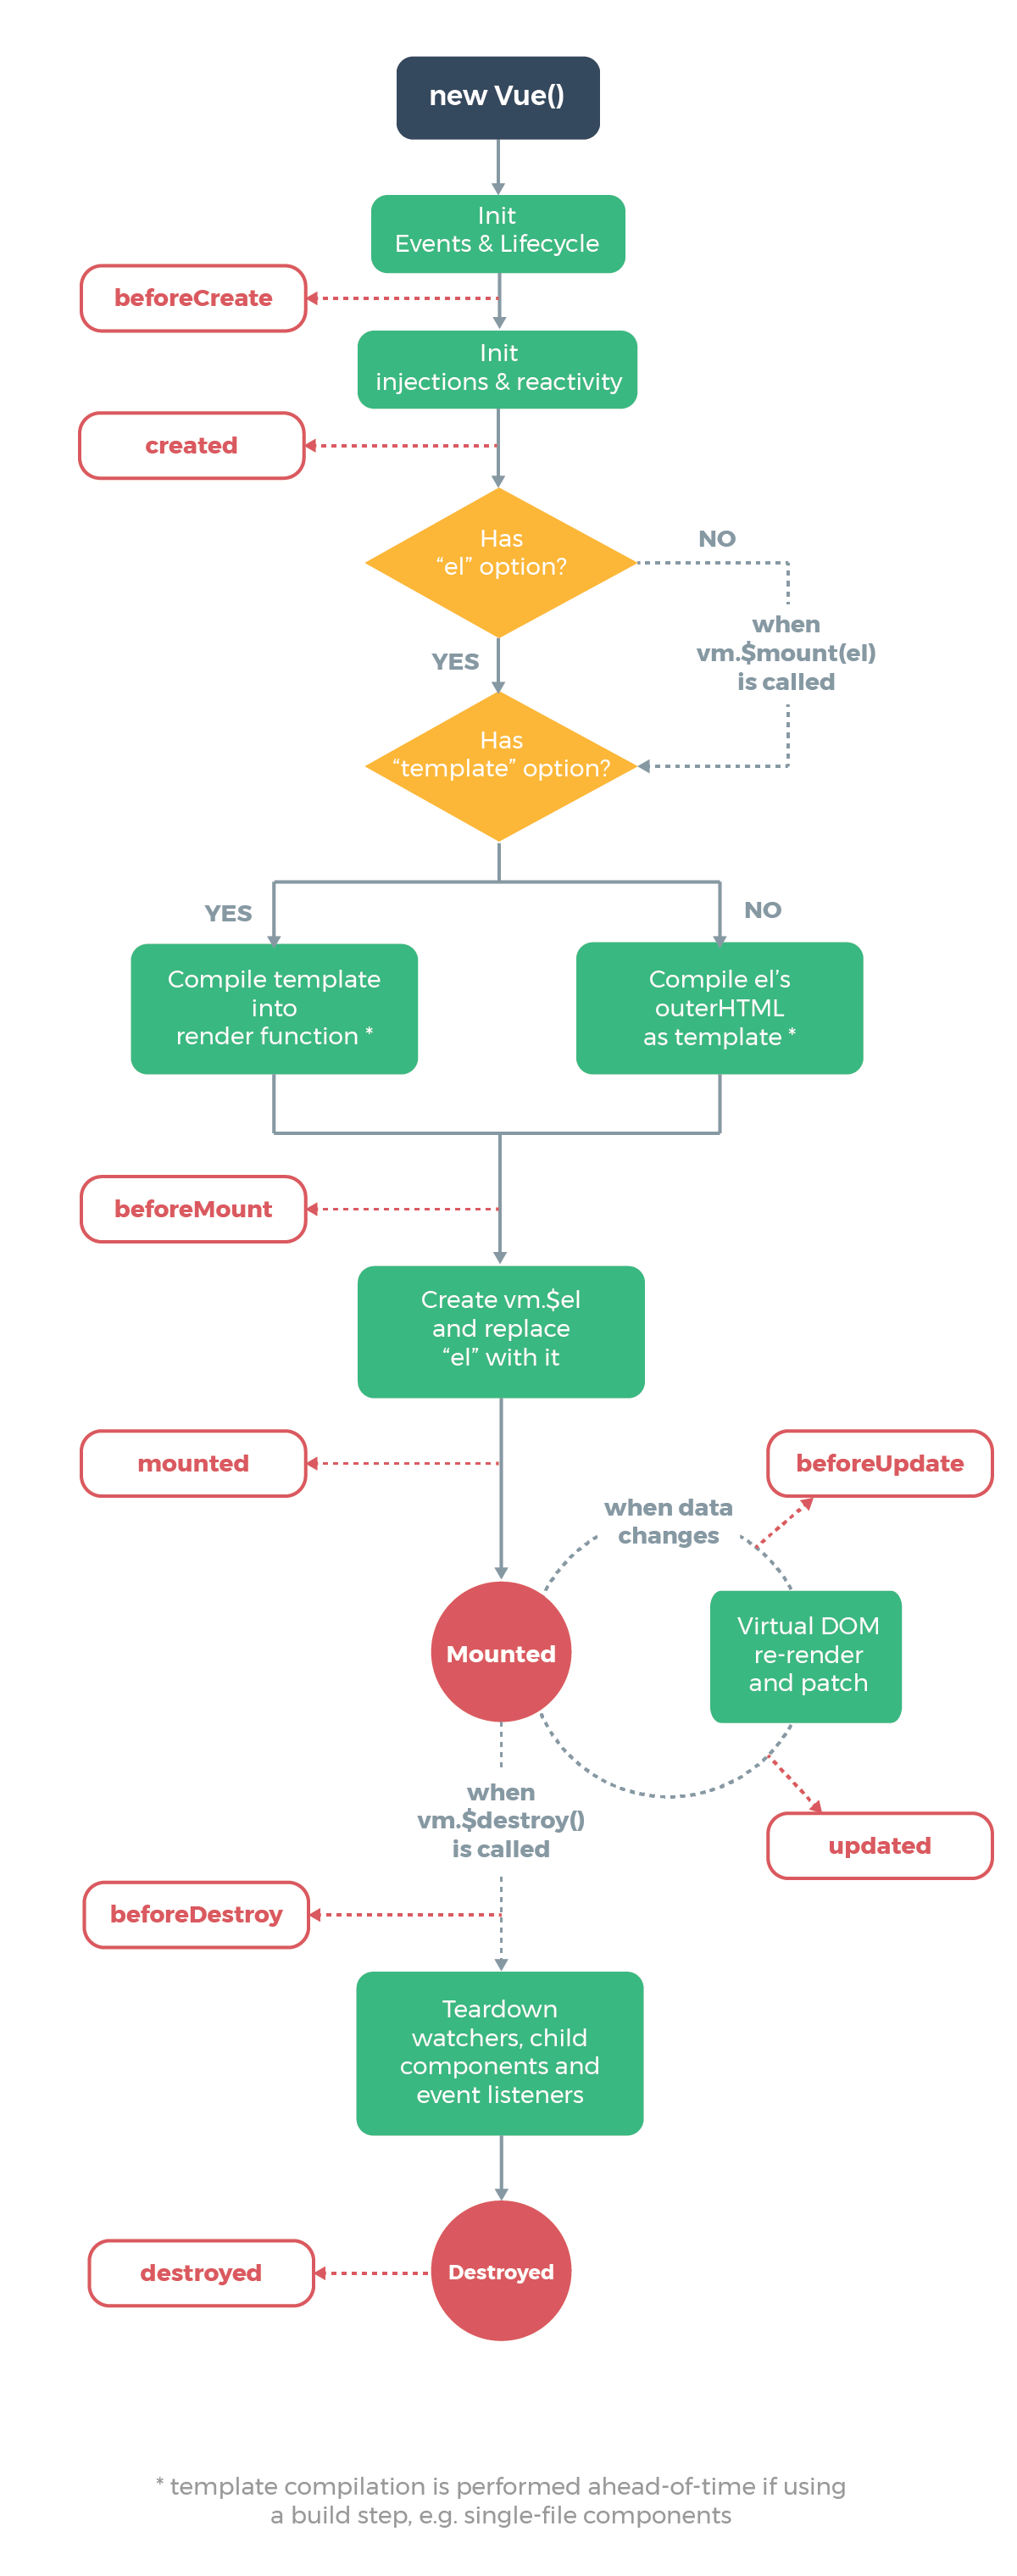
Each Vue instance lives and dies within a lifecycle. And along that cycle, it will trigger lifecycle hooks functions synchronously, which allows users to inject their code at specific stages.
In general, the lifecycle of a Vue instance can be presented in the following stages:
- Set up events and reactivity system for data (
beforeCreatedwill be triggered) - Compile and create the template with binding with the reactivity system (
createdwill be triggered) - Mounting the instance to DOM (
beforeMountandmountedhook will be triggered respectively) - Listen and update the DOM whenever data changes. (
beforeUpdateandupdatedwill be triggered respectively) - Remove all listeners and bound reactivity (
beforeDestroyanddestroyedwill be triggered respectively)
We will come back to discuss more on the lifecycle in later posts. Meanwhile, you can refer to the diagram below for a brief understanding.
Great. We’re almost done with our first component. Here comes the next question, how do we bind our properties to the view template?
Data binding and template
As said above, all Vue instance’s data is connected to the rendered DOM through its reactivity system. And templates are simply valid HTML-based syntax that will allow us to enable the binding between the rendered DOM and the underlying Vue instance’s data.
Mustache syntax
Vue.js supports text interpolation using double curly braces {{ }} (“Mustache” syntax). And we can write the relevant property expression as is, without the need of this on the template section.
<h3>{{ title }}</h3>
During compilation, the mustache tag {{ title }} will be replaced with the relevant value of title in our data object. And indeed, this tag field will be updated during run-time whenever the value of title changes.
However, we can’t apply the same approach with to set image property as source src of <img/>. Mustache syntax doesn’t work with HTML attributes. Instead, we use v-bind directive.
v-bind directive
v-bind directive helps to bind attribute(s) or a component prop to a data property expression. We can declare the binding with v-bind:[attribute] syntax or :[attribute] as its shorthand. Hence our img tag will be:
<img :src="image" />
And that’s it. The image of our Pokemon Card is bound and ready.
What about attaching our toggleSelect method to click event listener?
v-on directive
v-on and v-bind are the two most basic and frequent use in every Vue application. While v-bind only binds an attribute (or a prop) to data property, v-on attaches an event listener to the element, and ties that event to an available method or inline statement(s):
v-on:[event_type]="[accessible method | inline statement(s)]"

//OR

@:[event_type]="[accessible method | inline statement(s)]"
Which in our Pokemon Card, it will be
Notes: v-on can only listen to native DOM events when used on normal HTML elements. In this case, the method will receive the native event as the only argument and will have access to $event if using inline statement(s):
Besides, there are several event modifiers can be used to help to release the method logic from handling the DOM event details itself. These modifiers are directive postfixes denoted by a dot, which is equal to:
@[event-type].[event-modifer] = "[method | inline statement(s)]"

//Example:
//@click.stop=""toggleSelect"
Take event.stopPropagation() for an instance. Instead of writing:
toggleSelect(event) {
 event.stopPropagation();
 this.isSelected = !this.isSelected;
}
we can re-write as following:
toggleSelect() {
 this.isSelected = !this.isSelected;
}
And hence our code will be completely independent and reusable outside of the DOM event handling scope.
The full list of modifiers can be found in Vuejs documentation. Just for a quick look, there are some common modifiers that is worth to remember, such as:
.stop–>event.stopPropagation()..prevent–>event.preventDefault()..once- this will trigger handler at most once.
With these basic data-binding concepts, our final template now will be:
<template>
  {{ title }}
  Selected: {{ isSelected }}
</template>
And that’s it! Our component is ready. But wait one moment, we still can’t see it on the UI yet. Why? Because we still need to register it to the compiler.
Registering your component
To start using your component in a Vue app, you need to register it, for the compiler to retrieve the required information.
You can register components via 2 ways:
- Locally - Register to a specific component as its sub-components by adding it to
componentsand rename it if needed. The registered component will be scoped-available for use only by the component is registered to. For example, we want to registerPokemonCardas local components for using insideHomecomponent (which is located under theviewsfolder):
/* Home.vue */
import PokemonCard from '../components/PokemonCard.vue'

export default {

 //...

 components: { pokemon: PokemonCard }

}

//same as

export default {

 //...

 components: { PokemonCard } //take original name

}
Or
- Use
Vue.component()to make your components available globally within the app. Also, you can even rename the element for your needs.
/* main.js */
import PokemonCard from './components/PokemonCard.vue';

Vue.component('pokemon-card', PokemonCard) //kebab-case

//Or
Vue.component('PokemonCard', PokemonCard) //PascalCase
Note: For good practice, it’s recommended to have components defined with the PascalCase naming convention, since you can use either case when referencing its custom element in the HTML template. Which means
<pokemon-card/> //OK

<!-- Or -->

<PokemonCard/>//OK
will be the same.
However, if you wish to use it directly in the DOM, only kebab-case names such as pokemon-card will be valid.
Notes: In this series, we will register all components locally, to keep the app architecture as scoped and organized as possible.
Finally, let’s review our code of today’s post so far.
Styling in component
At this line, PokemonCard.vue code will be:
<!-- PokemonCard.vue -->
<template>

  {{ title }}

  Selected: {{ isSelected }}

</template>

export default {
  data() {
    return {
      title: "Sample pokemon",
      image:
      "https://res.cloudinary.com/mayashavin/image/upload/v1562279388/pokemons/br5xigetaqosvwf1r1eb.jpg",
      //Flag to keep track if component is selected
      isSelected: false
    }
  },
  methods: {
    toggleSelect() {
      this.isSelected = !this.isSelected;
    }
  }
};

<style>
</style>
Meanwhile in views/Home.vue:
<!-- Home.vue -->
<template>
</template>

// @ is an alias to /src
import PokemonCard from '@/components/PokemonCard.vue';

export default {
  name: 'home',
  components: {
    PokemonCard,
  },
};
And if you haven’t started local dev environment, simply run the following command on the terminal:
yarn serve
to start compiling and get the app served locally at https://localhost:8080 as:
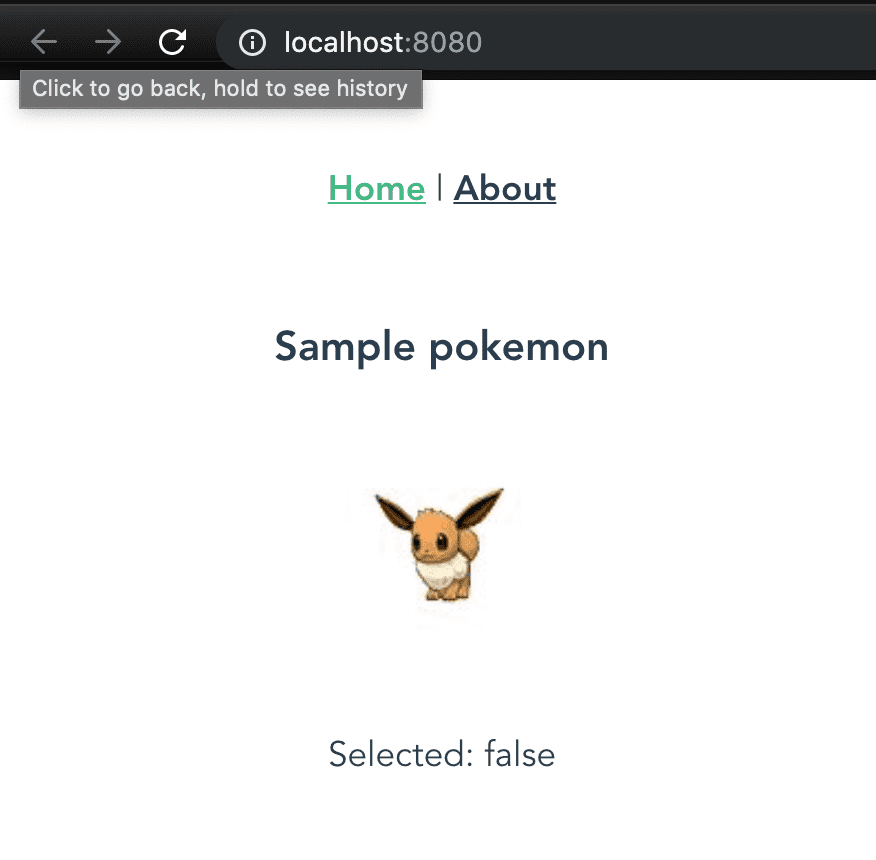
So far so good, right? But maybe a tiny touch 💅 to make the PokemonCard looks like a real card, shall we?
Let’s head to the section style inside PokemonCard.vue and do the following:
Make it scoped styling
scoped is absolutely a must-do for keeping the CSS styling applied only within the component. This is great to ensure our control over styling across the entire application.
Use lang with pre-processor
This is optional. If you feel more comfortable writing pure CSS, or less, or stylus, go ahead. It’s entirely up to you. But in case you don’t write pure CSS, remember to add lang="[pre-processor]" inside style tag. And here we go:
<!-- PokemonCard.vue -->
<style scoped lang="scss">
.card {
  border: 1px solid lightgray;
  padding: 5px;
  margin-right:10px;
  margin-bottom: 10px;
  width: 220px;
  box-shadow: 0 1px 2px rgba(0,0,0,.2);

  &:hover {
    background-color: #d3d3d363;
    cursor: pointer;
  }
}
</style>
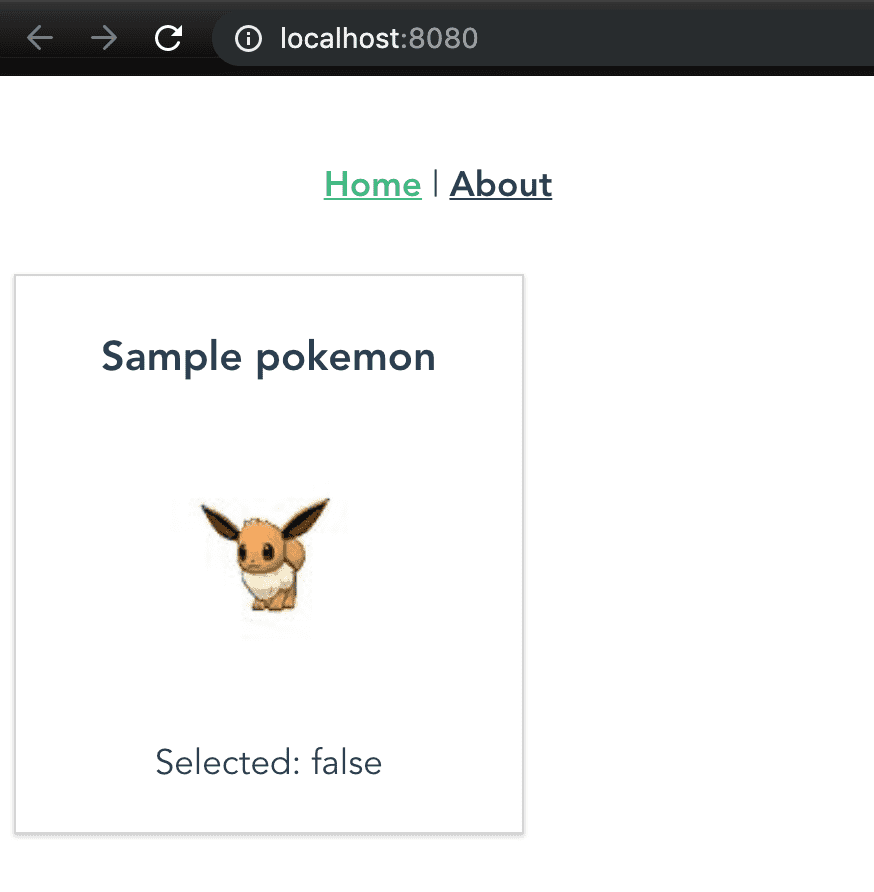
So how does it look right now in the browser?
Awesome! Much more beautiful, isn’t it? Congrats, you just got your first component created 🎉.
Conclusion
At this point, we have gone through the concept of Vue class, how the App instance works, and how to create a reactive component step-by-step, with a detailed explanation on basic options for that component. Moreover, we also learned about how to use the created component, globally and locally within the application.
Of course, our code is available for try out here
What’s next?
Since we only cover the basic configuration options such as data and methods, every PokemonCard component instance has the same data information value. What about computing different information to display based on the existing data properties of the component? In the next post, we will cover reactive dependencies and how data-binding using computed, watch property are done in Vue.js.
Until then, thank you so much for reading, stay tuned, and see you in the next post 🚀!

